Summary
This blog post will show you how to set up DNS-over-HTTPS using the open source pi-hole project to increase your browsing privacy by encrypting all DNS traffic for your home network. This is usually done on a raspberry pi, and although I will not be going over how to set up a raspberry pi, the official guide should be more than sufficient. In addition, this assumes you already have pi-hole installed, but that is extremely easy as well with their official instructions and automated install script.
NOTES:
- You don’t need to run this on a raspberry pi, any Linux server/VM or container will do.
- This guide mostly follows this pi-hole guide for DoH but I’m hoping to provide some further information and anecdotes as well as an example using Quad9 as a DoH resolver. Full credit to them for the actual install steps.
Why Bother?
If you are looking for a deep dive into DoH, Mozilla wrote this awesome article outlining many of the reasons DoH is helpful for privacy, and, at a high level, how some of the technology works.
TLDR: DNS requests are, by default, unencrypted. This means that every time you go to a website, anyone between you and the upstream resolver (like your internet service provider or a bad actor) will be able to view what site you are visiting. This gives them the possibility to alter the return information on the DNS request (sending you to a completely different site), collect profiling information on sites you visit for advertisements, and more.
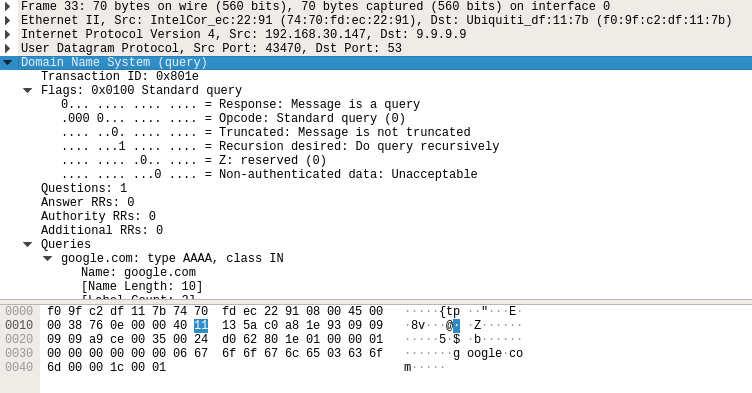
Standard DNS Request:
For example, here is a wireshark capture image of a standard DNS request. Notice how the payload is clearly readable:

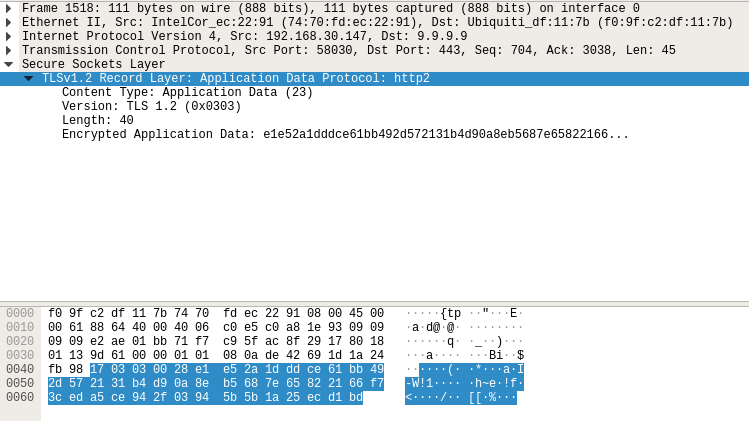
DoH DNS Request:
Now to compare, here is the same capture but for a DoH request. Notice that the payload is not readable because of TLS encryption:

Install Steps
(This is the section that mostly mirrors this pi-hole guide for DoH. I have just made a few changes to work with Quad9.)
Assuming you have already set up your raspberry pi, and installed pi-hole, we can now proceed with installing cloudflared, which can run as a sort of proxy to take DNS requests and forward them to an upstream resolver in the form of an encrypted DNS-over-HTTPS request.
- Download and Install:
NOTE: This particular script should only be used if you are installing on a raspberry pi. If you are using a different CPU architecture, you will need to get the appropriate download HERE
wget https://bin.equinox.io/c/VdrWdbjqyF/cloudflared-stable-linux-arm.tgz
tar -xvzf cloudflared-stable-linux-arm.tgz
sudo cp ./cloudflared /usr/local/bin
sudo chmod +x /usr/local/bin/cloudflared
cloudflared -v
- Add a user to run the daemon:
sudo useradd -s /usr/sbin/nologin -r -M cloudflared
- Create the following configuration file in
/etc/default/cloudflared:
NOTE: This example is using Quad9 resolvers as opposed to cloudflare.
# Commandline args for cloudflared
CLOUDFLARED_OPTS=--port 5053 --upstream https://9.9.9.9/dns-query --upstream https://149.112.112.112/dns-query
- Update permissions on the cloudflared executable and configuration file:
sudo chown cloudflared:cloudflared /etc/default/cloudflared
sudo chown cloudflared:cloudflared /usr/local/bin/cloudflared
- Create the systemd unit file at:
/lib/systemd/system/cloudflared.service:
[Unit]
Description=cloudflared DNS over HTTPS proxy
After=syslog.target network-online.target

[Service]
Type=simple
User=cloudflared
EnvironmentFile=/etc/default/cloudflared
ExecStart=/usr/local/bin/cloudflared proxy-dns $CLOUDFLARED_OPTS
Restart=on-failure
RestartSec=10
KillMode=process

[Install]
WantedBy=multi-user.target
- Enable and start the service:
sudo systemctl enable cloudflared
sudo systemctl start cloudflared
sudo systemctl status cloudflared
- Test:
dig @127.0.0.1 -p 5053 google.com

# It is also good to see the request while running tcpdump in another shell
sudo tcpdump -i any 'port 443'
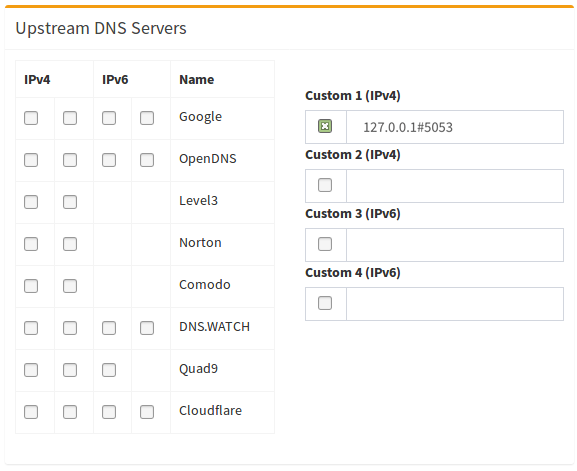
- Finally, update your pi-hole config in the admin portal to set the upstream resolver as localhost port 5053:

Making sure it works
This next step will be largely dependent on the networking equipment you have available to you on your home network. Personally, I am using the Ubiquiti EdgeRouter X, which allows me to run tcpdump directly on the router. If that is not available to you, there may be other options, such as sending router logs to a syslog server, or a web GUI view on traffic that is passing.
For me, I ran the following tcpdump command (the x.x.x.x should be replaced with the IP address of your pi-hole/DNS server).
sudo tcpdump -nni any 'port 53 and not host x.x.x.x'
You need to exclude the IP address of the pi-hole, because DNS requests on your network will still be sent as unencrypted queries. However, when the pi-hole has to communicate to the upstream Quad9 resolver, it will be using DoH (port 443).
In my case, almost everything seemed to be working normally, except for the IP addresses of my chromecasts. It seems that these devices have hard-coded 8.8.8.8 as their DNS server and ignore the DNS server I give them via DHCP. Interestingly, I blocked 8.8.8.8 on my router, and although the chromecasts still continue to try reaching out to 8.8.8.8, they will revert to the pi-hole IP address given to them via DHCP and work normally. If your router does not have basic ACL capabilities to block IP addresses, most routers should have the ability to make a black hole route by routing 8.8.8.8 to an invalid IP address like 0.0.0.0
Thanks for reading and feel free to leave a comment!
